WHITE DOMES

WHITE DOMES

From slot canyons to giant rock domes, this trail traverses through an extremely scenic and diverse area in a quick one-mile hike.
The White Domes Loop Trail is at the end of Mouse’s Tank Road. Travel north from the visitor center until you get to the White Domes Parking Lot.

Description

Only 1 mike loop Trail. Easy, and lots of different terrains to keep them interested.

LENGTH:

An easy 1 Mile loop – Takes around 30 minutes to an hour

TRAIL DETAILS:

This short loop trail wanders through short slot canyons and towering sandstone formations. From the parking lot, head south down the sandstone steps. At the bottom, you will see the remains of the movie set from The Professionals. From here, follow the signs through the wash leading into a short slot canyon. Once out of the slot canyon, turn right and take the trail looping back to the parking lot. 

The trail is dog friendly, but make sure your pup is on a leash. 


WEATHER

COST

Only $10 per vehicle! Check the official website for updated fee information.

LOCATION

White Domes Road (Mouse’s Tank Road), Valley of Fire State Park, Overton, NV 89040

DIRECTIONS

Address: White Domes Rd, Nevada 89040

GPS COORDINATES

Trailhead coordinates: 36.4859, -114.5329

GEAR CLOTHING WE NEEDED

.

WHITE DOME GALLERY

BACK TO:

ADVENTURES IN NEVADA

RECENT POSTS:

KODACHROME BASIN – ANGELS PALACE

KODACHROME BASIN – ANGELS PALACE

Talk about a little hidden gem! If you don’t like crowded parks, this is the place for you! I feel it has a little bit of Bryce, Capitol Reef, and Goblin Valley all mixed into one!

We stumbled upon this trying to find BLM camping on the Campendium app (which is great by the way!) and decided to stop in for a half-day. As always we stopped by the visitor center and asked them what was the best thing to do, and they referred us to ANGELS PALACE HIKE, so that’s exactly what we did!

ANGELS PALACE HIKE:

LENGTH:

  • 1.5 miles – 120ft elevation gain
  • Easy/moderate
  • Loop

TRAIL DETAILS:

The wide, sandy path remains mostly level at first as it enters a small canyon lined with orange sandstone. At the head of the shady ravine, the trail begins its 150-foot climb, first by gradually ascending the left-side wall, then switchbacking over to the right.

The trail flattens out as it nears the top of a ridge, following the north-facing slope. A short spur trail diverges from the main route and climbs to the end of a pencil-thin trail. Not for the faint-hearted. This vantage point offers splendid views of the basin below. After soaking in the vistas, return to the main trail and continue east across the sand and gently-sloping slickrock to the loop section of the hike. The first overlook on the loop is similar to the prior one, though you are now a bit closer to the throng of buttes and spires off to the south. The Gray Cliffs, rising around 800 feet from the basin floor, dominate views to the east. The final leg of the loop climbs rather steeply up a small ravine to reconnect with the original out-and-back trail. It’s a fun and easy hike for kids! We really loved all the views and enough diverse terrain so the kids don’t get bored! So that’s always a plus! 


WEATHER

COST

Only $10 per vehicle! Check the official website for updated fee information.

LOCATION

Kodachrome Basin State Park is located about 40 miles SE of Bryce Canyon.

The Angel’s Palace hike begins and ends one mile north of the Kodachrome Basin Visitor Center. Park on the left-hand side of the road near the entrance to the shady Nature Trail, but cross the street to the east side to begin the Angel’s Palace Trail.

DIRECTIONS:

Approximately 300 miles south of Salt Lake City.
Nine miles south of the town of Cannonville off of Highway 12.

Address: PO Box 180069 Cannonville, UT 84718

GPS COORDINATES

KODACHROME BASIN STATE PARK: 37.5178° N, 111.9940° W

GEAR CLOTHING WE NEEDED

.

KODACHROME BASIN GALLERY

WHERE TO CAMP:

Kodachrome Basin State Park has two great campgrounds to choose from.

Amenities: Fire rings and tables at each site, vault toilet, water tap. Showers available at Oasis Group Site or Basin Campground.

Basin Campground (Closed December 1 to March 1)

  • Basin campground is nestled right at the head of the basin and offers views of one of the many sandpipes that the park is known for and you are surrounded by large white hills and are within a short walking distance to access most of the hiking trails.
  • Flush toilets and hot showers located in campground

Bryce View Campground (Closed November 1 to March 1)

  • Bryce View Campground offers just exactly what the name implies. Great views of the pink ledges of Bryce Canyon in the distance and in the forefront, spectacular views of sandpipes and sandstone. This campground offers a great view of the sunset as well.
  • Location: Gravel road access 1/4 mile past Arch Group Site.

BACK TO:

ADVENTURES IN UTAH

RECENT POSTS:

DELICATE ARCH

DELICATE ARCH

The sudden appearance of this beautiful arch, perched on the edge of a huge sandstone bowl and framed by the scenic La Sal Mountains, will literally take your breath away.

Description

If you’re in Utah it is hard to miss the iconic image of Delicate Arch because it’s everywhere and even in your face on our license plates! However, it’s only when you hike to the arch that you will gain a full appreciation of this stunning natural formation! The opening below the arch is 46 feet high, making this the largest free-standing arch in Arches National Park, and known around the world.


During most of the hike, the arch is hidden from view. It is only at the end, as you round the end of a sandstone ridge, that Delicate Arch springs into view. The sudden appearance of this beautiful arch, perched on the edge of a huge sandstone bowl and framed by the scenic La Sal Mountains, will literally take your breath away.

LENGTH:

3.2 miles round trip and climbs 480ft.

TRAIL DETAILS:


The hike to the arch is not difficult. The short, popular trail traverses a desert landscape along a wide, well-defined trail for the first 0.75 miles and then follows a cairned trail up a slick rock slope with nice views of the red rock formation to the south. The hardest part is around 1 mile where you walk up a steep section of slickrock. Along the way, follow the rock cairns, or the people in front of you, for it is a very busy hike. Shortly before reaching the arch, the trail travels along an exposed sandstone ledge, which may be a concern for anyone with a fear of heights.
As an added bonus a 0.25 miles side trip near the trailhead visits a small panel of petroglyphs on a rock face near the Wolfe Ranch.
Oh! And for some added fun try this hike at night the 2nd time by the moonlight!


WEATHER

Make sure to bring sunscreen, and at least 2 liters of water per person.

Spring and Fall are the best months to visit to avoid the heat. There is no shade along this hike, so if you do go in the summer make sure to bring extra water.

Winter is the best month to go to avoid the crowds.

COST

$25 per vehicle to enter Arches National Park. Check the official website for updated fee information.

However, you can also purchase the Annual Pass for $80 to get into all USA National Parks if you are exploring more in a year’s time. You can purchase these passes onsite or we usually get our from a local REI as well! These are GREAT gifts you know explorers!

LOCATION

The trial head starts at the Wolfe Ranch Parking Area in Arches National Park, Moab UT

DIRECTIONS

The entrance to Arches National Park is north of the town of Moab, Utah.

  • From Moab, drive north on US 191 for five miles, or
  • From Interstate 70 (Crescent Junction), drive south on US 191 for 22 miles.
  •  Drive northward along the park road for 11.7 miles to the Wolfe Ranch Road. Turn right and follow signs to the ranch. Do not follow signs to Delicate Arch Viewpoint, that is a different trailhead.

GPS COORDINATES

Parking Lot: 38.7357 -1095206
Delicate Arch: 38.743517,-109.499341

GEAR CLOTHING WE NEEDED

.

DELICATE ARCH GALLERY

BACK TO:

ADVENTURES IN UTAH

RECENT POSTS:

PEEK-A-BOO & SPOOKY GULCH

PEEK-A-BOO & SPOOKY GULCH

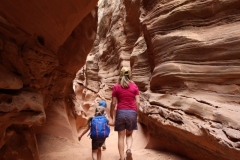
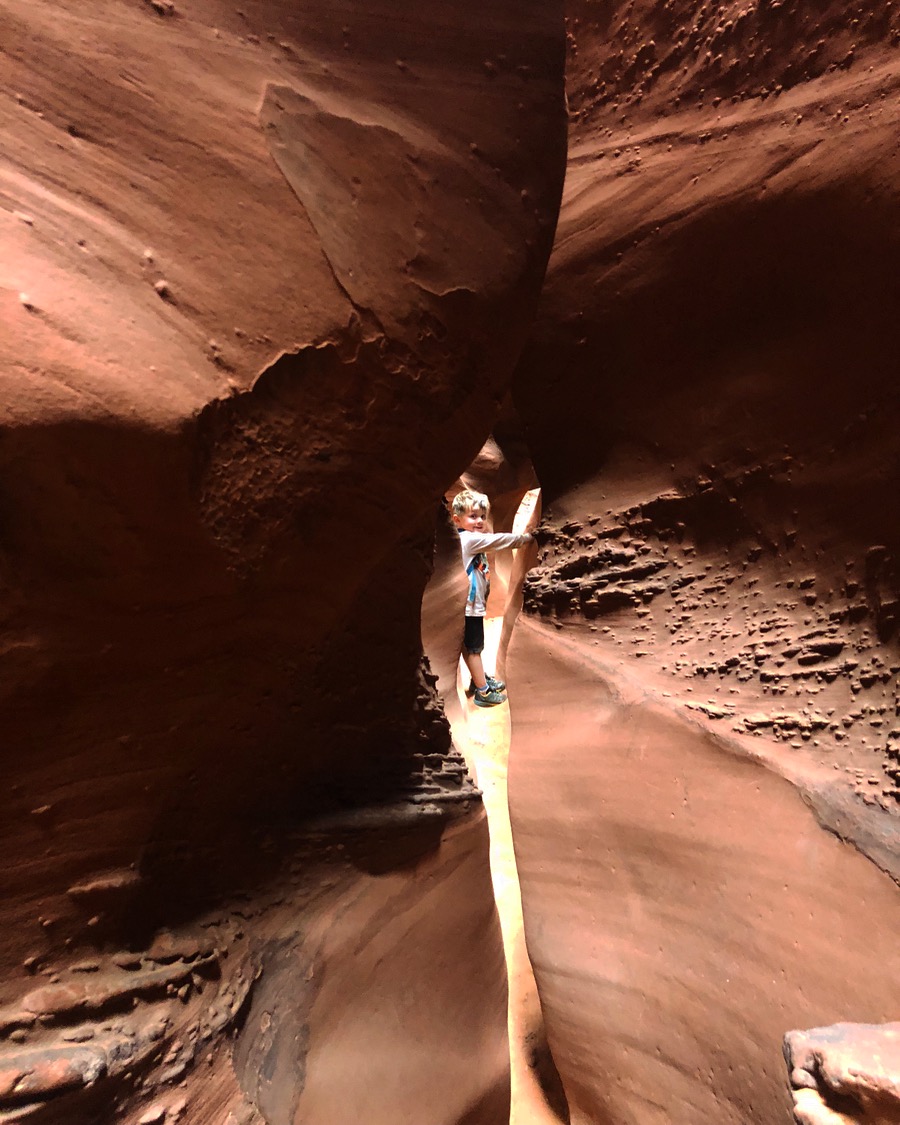
This three-miler will give you stellar views and a new perspective of slot canyons in Southern Utah. Spooky is well-named and pretty famous for how dark it gets when deep in a slot, and for the panic-inspiring quality of its extremely narrow walls.

Description

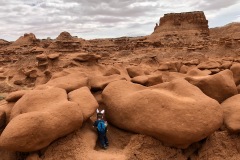
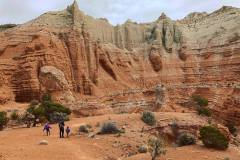
Peek-a-boo is a short slot canyon in the Dry Fork area of the Grand Staircase- Escalante area. Peek-a-boo is not very long, or physically demanding, but it requires some navigational and rock-scrambling skill in order to get through its twists and chutes.

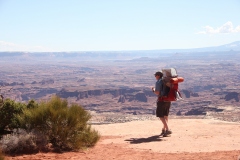
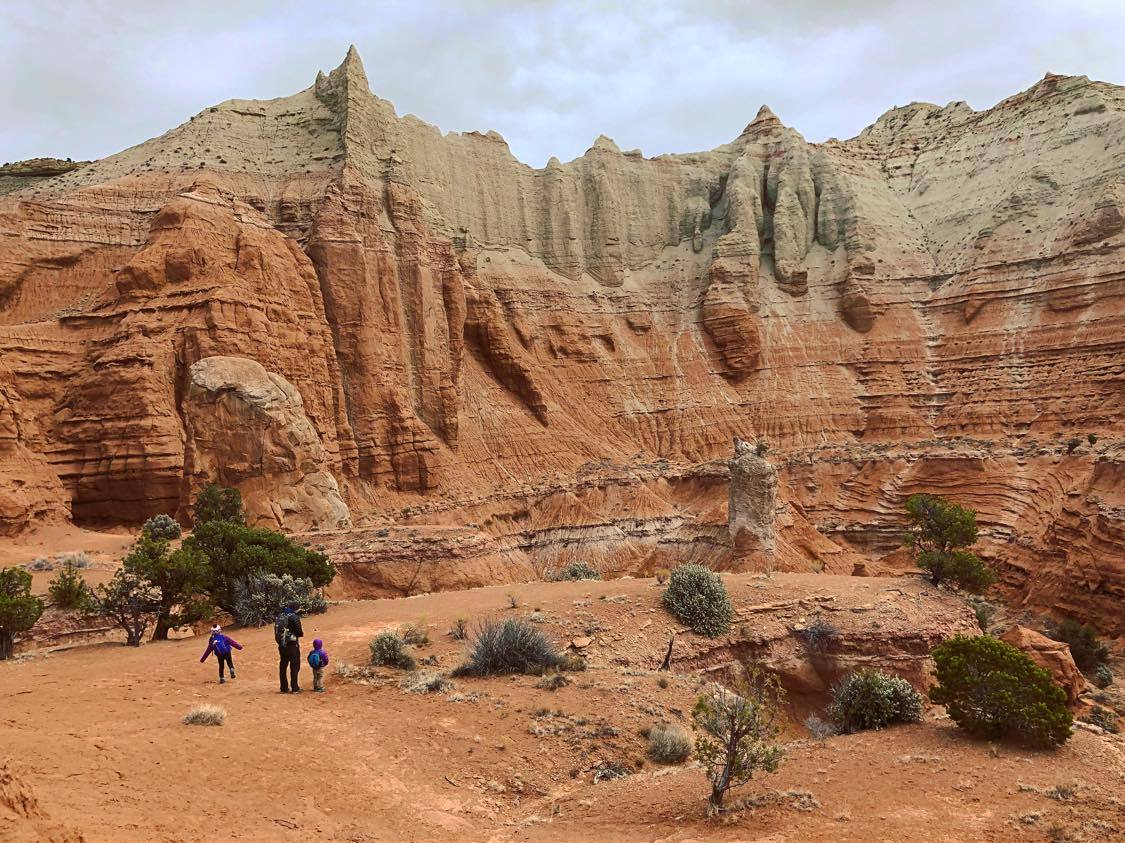
Right off the bat, as visitors begin the trail from the bottom of Dry Fork, they will note the steps carved into the wall that they must climb in order to reach the slot canyon. (About 10 feet)

Unlike many of the Escalante-area slot canyons, Peek-a-Boo and Spooky Gulch require zero technical gear or know-how—although it requires some navigational and rock-scrambling skill. Peek-A-Boo is a slot and corkscrew, and Spooky Gulch is a narrow slot canyon. It is worth noting, due to the restrictive nature of the some of the spaces in Spooky, this canyon is better suited for smaller body types.

LENGTH:

3.5 mile loop

The loop generally takes about 3-4 hours.

TRAIL DETAILS:


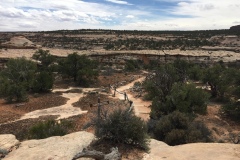
Peek-a-boo should be combined with Spooky Gulch to make an awesome loop hike. The recommended route is to actually take Peek-a-boo Gulch first, scrambling north up through its depths, and upon exiting, hiking overland to the east for half a mile until the wide streambed above Spooky Gulch is reached. From there, follow Spooky back down to Dry Fork, and then hike back to the overlook. The total loop route is about 3.5 miles long.

Once out of Peek-a-boo keep hiking (longer than you think you should, most likely) until you come to a juniper tree, then follow the trail and cairns leading to the right and the entrance of Spooky Gulch. Scramble down a mellow rock/sand face to get into the canyon. It soon tightens up, and you’ll be having a good time navigating the confines of this fun canyon.

The opening to Spooky is wide and dark, though it closes up within short order. Only a few hundred feet into the canyon, normal-sized adults will begin having difficulty, as you ascend or descend there are about 2-5ft TIGHT drops and 1 large 10ft drop. (We just handed the kids to one another, and it worked fine.) Sorry, no pictures of this action. I wish I had a hands free @gopro now. Haha


WEATHER

Just make sure you always check the weather report, because this is a flash-flood country, and June, July, and August carry the greatest risk. And while we were in here we were thinking, there’s nowhere to go if the waters came.

COST

Free!

THINGS WE LEARNED:

  • You don’t need rope
  • Wear SMALL packs for only water and food. There was no way for us to wear packs in Spooky! We had to hand them to each other through tight places.
  • Perfect fit for kids, and yes they CAN do it!

LOCATION

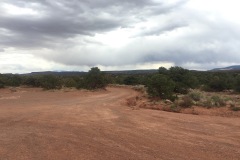
The Grand Staircase–Escalante National Monument down Hole in the Rock Road (a 29 mile washboard road)

DIRECTIONS

In order to reach the trail, you must drive the 26.3 miles down Hole-in-the-Rock Road off of Highway 12, until you find the Dry Fork Road, heading northeast into the desert. The Dry Fork turnoff branches after only a few hundred yards and visitors need to stay left in order to reach the Dry Fork overlook. There is a parking lot at the end of the Dry Fork road.

The entire route from Highway 12 is an extremely rugged washboard road with sand traps and the occasional rut. Though vans and cars can tackle the route, a high clearance vehicle with decent suspension is recommended.

Make sure you have a full tank of gas and lots of water as there are no amenities down this rough dirt road.

GPS COORDINATES

Dry Fork Turnoff (37.466336, -111.223912)

Dry Fork Overlook (37.476527, -111.220234)

TRAILHEAD: (37.476782, -111.220040)

Peek-a-boo Gulch Entrance: (37.481407, -111.216655)

Spooky Gulch Bottom (37.481151, -111.209235)

GEAR CLOTHING WE NEEDED

.

PEEK-A-BOO GULCH GALLERY

SPOOKY GULCH GALLERY

BACK TO:

ADVENTURES IN UTAH

RECENT POSTS:

OUR RIGS

OUR RIGS

A look back at our van conversions, and why we made the switch from car camping to van life.

Our first van, Rusty, is a 144 low roof Sprinter Van. We flew out to Nebraska and purchased it with $144,000 miles for $4,500. Knowing that these vans can go 400,000+ miles made the high mileage not a concern especially for the price. We ended up investing $18,500 into the build and then sold it 2 years later for $35,000.

RUSTY: BEFORE & AFTER

I loved this van. It encapsulated a whole new ease and style of travel. Not that we didn’t LOVE car camping. We really did love it. Shoot, after a 10 day trip to Canada I cried on my way home wanting to continue to live in a crammed ’95 Camry wagon for longer. But with that said there were a few things that bothered me that I saw the Sprinter being able to help with.

  • LEG ROOM: We were packed to the max. Things were packed on the floor between the seats and I barley had room for my feet. It worked and it got us to some amazing places, but it was just harder. We always made the joke that the car would throw up our gear when we got to camp or to a trail head and had to pack our packs.
  • PACKING: The thought that I could have a vehicle that stored all of my camping gear and I could literally say I want to go camping, grab some food and GO. I hate packing, so this sounded like a dream.
  • WEATHER: It’s never fun to admit you came home early because of the weather. You feel like a failure, like your not tough enough, or rugged enough, right? This has happened to us a handful of times. Sometimes there is just nothing you can do when its pouring outside and freezing and you have 2 toddlers to entertain while constantly trying to keep them dry and warm. Hiking and exploring in bad weather isn’t a problem for us. If we could have a place where we could escape the bad weather, cook, play games, and stay warm, then we could stay longer. We wouldn’t get rained out and have to return home early.
  • QUICK EXIT: As parents we learned early on that we can get a lot of miles in driving when the kids sleep at night. We would leave after work and drive until 12 or 1am, pull over, pull everything out, blow it up, sleep, wake up early, deflate everything, stuff it tight, and put it all away. (We actually got pretty quick at it. We timed ourselves once and it was around 20 minutes!) But what if we already had the bed set up, pull over, get in bed, and then in the morning wake up and immediately get in our seats! Whoa… that would be amazing.

There are more reasons why we fantasized after a van, but those are really our top 4 that drove the dream.

Rusty did in fact create a new style of travel for us. We could go farther in a short period of time. We could go more often, because everything was already packed up. I think another reason why I loved it so much is because we put sooo much work into it. Yes, we did only spend $4,500, but that required ALOT of TLC.

RUSTY’S TRANSFORMATION

WHY WE BUILT A NEW VAN

You may be asking WHY? Why change? Why get a new one after all that work?

We really would have kept Rusty if it wasn’t for our choice of going full time. It was a perfect camping van. However, Rusty, lit a fire in us. A fire to never come home. The van made it soooo much easier to camp and go and explore. It seemed effortless now. What if we did this full time? What if we traveled even further? What if we quit our jobs and traveled the longest road in the world?

In the beginning we made the decision to travel the Pan American Highway in Rusty, however, to be honest… Scott never loved Rusty. Hince the name… It just had so much rust on the undercarriage and he couldn’t shake the thought of taking it on a 50,000 mile overlanding journey. He needed something that he could fix on the side of the road and not worry about the breaks fusing together because rust.

I was against this thought for so many months. I wouldn’t even entertain it. The thought of building a new van and starting the whole process over seemed overwhelming and gave me anxiety. It was fun building the van with Scott and I side by side and our endless discussions was awesome. Working full time, being parents and trying to build on nights and the weekends was harder to balance than we thought. The kids were troopers. We all gave up a lot, but knew we would gain more in return. When it came down to it, I knew the kids were growing fast and all of us sleeping in the same bed was getting harder and harder. It would be even more difficult when we were in the hot humidly of Central America. We had planned to add on a Colorado Campervan Pop Top that would be the kids room. This was a very big investment for a van that Scott didn’t trust. They’re around $15,000. Crazy, huh? Not only did we have to add on a pop top, but we also had to add in solar and more electrical ($5,000), sink and plumbing, and other items. It was all adding up quickly and came to the point where we both realized it was just too much to invest in a van that wasn’t clean and already had given us some mechanical issues. I gave in and realized Scott was right.

I never get attached to vehicles. It’s always been easy to move on to the next. However, Rusty stole my heart, and truly changed our lives. It’s because of this van our outlook on adventure expanded to the possibility of full time travel, and now when that it’s right at the door, I’m not letting it take us there. With a broken heart, I said goodbye to Rusty, and sent him off with a couple who had lots of fun adventures planned. We follow them on instagram and love to seeing Rusty still going strong and off to new adventures!

OUR NEW RIG: EL GATO GORDO

We’re super stoked about our new van, El Gato Gordo (The Fat Cat).

2008 Dodge / Mercedes Sprinter Van- 170 high roof, 2500 diesel

BEFORE & AFTER

Main differences:

  • High Roof vs Low Roof = 1ft higher (allows for overhead storage)
  • 144 vs 170 (wheel base) = 3ft longer (allows to add in a larger kitchen + kids bunk beds)
  • 38,000 v.s 165,000 miles = lower mileage (peace of mind)
  • Passenger vs Cargo = No need to add kid seats, windows, headliner, or side paneling. (saves an amazing amount of time)
  • Nebraska vs Arizona = Rusty came from Nebraska where they used salt on the roads where corrosion was more of an issue. El Gato Gordo came from Arizona where this wasn’t an issue. (Full Paint & New Door – $7,500)
  • More Options = A lot more options: LCD Display, aux diesel heater from factory, etc.

All in all the cost to move to Rusty to El Gato Gordo was a wash. With the money we made from Rusty we were able to purchase our new van and build it out for the same cost we were going to have into Rusty. Once again, Scott was right. It was the best decision to start over. A lot of work, but hard work pays off.

RECENT POSTS:

GET THE GEAR… CHEAPLY.

GET THE GEAR… CHEAPLY.

Gear. This is a passion of mine. I love to read about, purchase, use, and sell camping gear. It used to be an obsession at one point and Keri has helped me to take a step back and realize that 6 tents and a dozen sleeping bags is too much for a family of 4. In my quest to make sure that I had the right tent for potentially a last minute trip to Everest or a stove that will never blow out in the winds of Patagonia I’ve figured out how to get the highest quality gear at the lowest price possible. Here are some tips to finding great deals on used and new gear.

First you need to decide if used gear works for you. If it does, you can save a whole lot of money. In years past I bought only new gear, until it dawned on me, with Keri’s help, that I’m buying things to use in the dirt, so who cares if it has someone else’s dirt on it. She’s a genius that woman. When you’re starting out I recommend buying used, but if you are looking for more specialized equipment that is not so common new might be the only option. 

Camping isn’t for everyone and that’s great news for anyone who does enjoy it. Time and again I’ve bought gear that someone purchased for a trip and only used it for a weekend. People decide it’s not their thing and you can score some amazing deals on like new items. Scour your local craigslist, Facebook Marketplace and eBay.

REI

If you’re not a member of REI, I’d recommend becoming one. They have everything imaginable needed to get outside. By becoming a member you’ll get a 20% coupon for regular priced and outlet items a couple times a year, which is nice. The real benefit to me is access to the member’s only garage sales. Our local store probably has 3-4 a year and you can score some great deals. REI has a generous return policy and everything that has been brought back, but can not be sold as new will be offered to member’s there. Some of the things you will see are super hammered and are not worth your time, but if you know what you’re looking for, amazing deals can be had. Also, sign up for their email list as they have periodic sales in there Outlet where you can get really good deals. 

GEARTRADE.COM

One of my favorite websites is geartrade.com. This is a site where people can unload new and used gear. I’ve had over 25 purchases there and gotten some super cheap things. Almost everything I’ve purchased has come from one seller: Backcountry. That’s right, Backcountry.com. They have an account and post new items every weekday. Because Backcountry has a return policy similar to REI they receive all sorts of returns. Some returns get listed on their eBay page and some on their Geartrade account. I’ve bought Western Mountaineering sleeping bags that never go sale for 40% off because they were missing tags or a MSR tent 50% off because it didn’t have stakes. Another cool thing is that Backcountry offers free shipping. They also list a lot of apparel and shoes. When looking for things this is the first place I go. 

LOCAL THRIFT STORES

A great place for outdoor clothing and gear is your local thrift stores. I can usually find an old Coleman stove, dishes, silverware, and a Nalgene water bottle without breaking a sweat. There are tons of treasure to be found in the clothing areas as well. Keri likes to hike in Patagonia tights and they run like $80, but she has thrift store tights that work just as well for $5. Synthetic hiking shirts can be expensive, but a shirt from some random marathon you didn’t run will suffice for $3 bucks. Getting kids clothes for camping here is a great idea because you know they don’t think twice about sliding down that rocky hill on their butt or playing in the mud and getting covered. You’ll feel a lot better about it when you know those shorts were $3 and the shirt was $2. Another tip is to get a cheap fleece for sitting around the fire. I’ve burnt a few holes in expensive jackets from flying embers and it really bummed me out. I don’t feel too bad about a thrift store jacket getting singed. 

PURCHASE USED ITEMS

One of my favorite tips for used gear is not be afraid to buy a tent that might have a hole in the rain fly and a broken pole or a sleeping pad that has a small hole in it. These things will happen anyway as you start to use them more. By learning how to repair things you’ll be ready when it occurs again in the future. Down jackets are expensive and they tend to be somewhat fragile. It’s easy to get a rip or tear and many people don’t know how or don’t want to learn how to fix them and will list them cheaply on eBay or donate them to goodwill. There are a lot of videos on youtube that will outline how to fix anything. It’s really not that hard and the savings can be intense. By doing this you’ll save some things from the landfill and that feels good.

When it comes to buying new gear at a discount I like to look at a few different websites:

Steepandcheap.com – They have a lot of last season and discontinued styles. 30-50% off retail is the norm.

Sierratradingpost.com – Similar to Steepandcheap as they also have a lot of last season and discontinued styles. 30-50% off retail is the norm.

TheClymb.com – They have sales on featured brands for a week or two and then another brand will be featured. 30-70% off retail.

REI-Outlet.com – Some deals can be had on all sorts of outdoor gear. They also have daily deals.

Amazon.com – They have everything that is offered at all of these other websites and more. One thing that they offer is cheap chinese knockoffs of high end gear. You can get a backpacking chair at REI for $100 or an exact replica by some unheard of brand for $40. They have a chinese knockoff of every piece of gear you could imagine. The quality might not be the same so be cautious and read the reviews carefully.

I’ve seen some decent deals on things at Costco like coolers and trekking poles. If you see it in store, buy it. They change their inventory constantly and it might not be there next time. They also have gear on their website.

OUTDOOR RETAILERS

Lastly, if you happen to work in the outdoor industry or have a job that requires you spend a lot of time in the outdoors you might be able to qualify for special discounts from different manufacturers. Check out expertvoice.com and outdoorprolink.com to see if you qualify.

I’m sure I missed some great places to get gear, so don’t be afraid to reach out and let me know some of your favorites places to shop and tips to save some cash.

-SCOTT

RECENT POSTS:

SLEEPING PADS

SLEEPING PADS

When Keri and I first started camping, she would be having a great time until we crawled into the tent to sleep. The party was over. She would toss and turn throughout the night and just could not get into a deep sleep. This really bummed me out because I felt like I had let her down. I was the gear guy. If something didn’t work I had not done my research properly. I set off to make sure that every night moving forward she would sleep like a baby in a kid carrier. That’s a weird way to put it, but if you’ve ever carried a child on an extended hike through nap time, you know what I’m talking about.  I set to work and over the years have tried most major brands and different styles of construction and materials. I think we’ve settled on two sleeping pads that have ticked as many possible boxes for us and we’ve been sleeping soundly for years.

Our family backpacks and car camps, so we found it works best for us to each have two sleeping pads.

The car camping pad can have a focus more towards comfort with packed size and weight being less of a concern.

Backpacking pads need to be light and pack small with comfort coming in behind those two.

What we use for car camping:

This mat is the real deal. We have three that we use to fill the entire tent floor. It makes the tent into a giant bed and has been great for wrestling with the kiddos. Each mat is 30” x 78” and is 4” thick. The pack size is a little big as they are a self inflating foam mat. Each mat comes with a repair kit and stuff sack which is nice. These are in top three of the best camping equipment I’ve ever purchased. We sleep so soundly on them and look forward to going to be each night we’re out. They’ve been super durable and we’ve put over 100 nights on them. Another nice option is they make a great bed for when company comes or if you want to make a large mat at home and watch a movie as a family. I couldn’t recommend these any higher.

What we use for backpacking:

When the NeoAir was released it was a game changer. How could a mat pack this small, be so light, and still be warm? It’s all those things and more. The kids use the “women’s” version which is smaller, lighter, and has a higher R-value than the regular X-light. Because they are so light and small they easily fit in the kid’s backpacks. Keri and I use the large sized mats for a little more wiggle room in the torso area. They are 2.5” thick and that is plenty to provide a comfortable night’s rest. Therm-a-Rest designed these with packed size and weight in mind, so there are some tradeoffs that had to be made. The thin reflective material does make some noise when you move around and it is a little more fragile than other pads. Some people compare the noise to wrinkling a chip bag. They are rather expensive as well. Beyond those things, this is one of the best backpacking pads out there. 

When looking at sleeping pads there are numerous things that need to looked at before making a purchase.

They are: Thickness, R-value, Weight, Size/Shape, Material/Construction, and Price.

  • Thickness in pads can vary from 1 inch to over 5 inches. Usually the thicker the mattress is the more comfortable the pad will be. If you tend to sleep on your back you can typically get away with a thinner mat. Side sleepers need a little more cushion to keep their hip off the ground. We use a car camping mat that is 4” thick and a backpacking pad that is 2.5”.
  • R-Value has to do with the insulating properties of a sleeping mat. This year a standard was set in the outdoor industry that now requires all manufacturers to test their pads in the same manner which makes it much easier to compare different models. It’s important to know what temperatures you will be camping in and buy a mat that is rated for those temps. It really sucks to have an under-insulated mat when the temperature drops below freezing. Most companies that make backpacking pads will make different versions of the same pad that will be insulated and uninsulated, so be careful when shopping. The uninsulated mat will be lighter and would be great for summer desert trips, but in the mountains it’s not always your best bet. Here’s a chart that gives a basic outline of what value is appropriate for a given season: 
  • Weight is a very important consideration for backpacking, not so much for car camping. It’s not hard to find a 3-4 season pad that easily weighs under 1 pound nowadays. The pad that our kids use weigh only 12 oz! It’s pretty crazy how light they have become. Our camp pads lie on the other end of the spectrum at 70 oz (5 lbs. 10 oz). Understand that the lightest pads will be made of more fragile material and durability goes down along with the weight. 
  • Size and shape are important in relation to how big or small a mat is when inflated and when it is packed away. The “regular” backpacking pad size has been 20” x 72”. In the past 5-10 years sizing has really expanded you can get the exact size that you need. This is great as you don’t have to carry a larger pad that can weigh more when you only need a torso pad. For backpacking our kids use a “Women’s” mat which is 66” x 20” and Keri and I use a large mat that is 25” x 76”.  Mats also come two different shapes: Mummy and Rectangular. A mummy shaped pad will taper from the torso down to the feet. A rectangular pad will carry it’s width from top to bottom. It’s also possible to get double mats which are great for couples that like to cuddle and cut down on weight. Keri and I prefer two mats 😉
  • The construction and materials of sleeping pads also varies greatly. The most basic pads are just closed cell foam. They’re cheap and can’t pop because they contain no air. Self inflating mattresses contain open cell foam that is covered with a air tight material. These are nice because they don’t require too much air when inflated, but you can fine tune the firmness. Next we have air mattresses. They pack small and when inflated can be pretty comfortable. They need a lot of air depending on the size and if they start to leak, you’ll wake up flat on the ground. As you go towards the lighter side of sleeping pads you’ll be looking at air mattresses with very thin outer material and super small pack sizes. To push the envelope on weight manufacturers have come up with amazing innovations in construction with welding seams and creating reflective materials to boost the R-value without adding bulk and weight. 
  • Price can be the #1 determining factor when buying a sleeping pad. Buy what you can afford and get out there. With that said, a good night’s sleep can pay major dividends when on an extended trip or when you’re enjoying strenuous days outside. I have been through many pads trying to save money and buying something that might be good enough. Personally this where I would not skimp and spend the money. Don’t ever pay retail though. REI, Backcountry, Campsaver, and many other companies offer deals around major holidays and 20% off coupons are usually available at these times. I personally prefer to buy used gear when I can and look on eBay, craigslist, and geartrade.com. At REI garage sales you can save a lot of money when you buy a used pad that has a leak. This is great because they are not hard to fix and you’ll learn the skills you need when leaks crop up again. 

A lot of people get turned off to camping because of sleeping like crap. I think a good pad goes a long way to changing people’s mind.

If you have a small car I would look into buying a backpacking pad because the size difference can be substantial between that and a dedicated car camping mat. That will free up more room for other gear and food. Some air mats are even available with a separate memory foam topper to increase comfort when weight is not a concern and they can be left behind when weight is. If possible head to your local outdoor store and they might have a good selection of mats that are already inflated for you to test out.

As far as brands go I’ve had good luck with Therm-a-Rest, Exped, N.E.M.O, Sea to Summit, Big Agnes, and REI. They all have extensive lineups and should be able to meet your needs.

I love all things related to camping gear, so if you have any questions or suggestions to make this article better please let me know!

– SCOTT

ENTERTAINING KIDS

ENTERTAINING KIDS

Let’s be real with it. This is the hardest, most feared, and least exciting part of an adventure. Shoot, maybe this is why you don’t go many places. You’re scared of the drive.

It doesn’t have to be that way. There are a lot of fun activities that can keep them and you entertained at the same time.

If you have babies and are scared to go on long drives, the absolute BEST thing to do is start them now. Get them used to sleeping in their car seat. Get yourself comfortable with climbing over the seat and sitting next to them and signing them nursery rhymes.

We have listed and linked all the ideas we have come up with that have worked for us in the past.  Each item is clickable and you can read more about how we used it.

TIPS FOR EXTENDING TIME:

  • KEEP NORMAL DRIVING ROUTINES:  My routine is that I never let them do anything for the first hour.  That includes ipad, movies, coloring, snacks, nothing.  I make them look out the window.  That’s like a normal drive to Grandmaws, so they can’t run through all the fun stuff and snacks at the very beginning.  
  • SET TIME GOALS. I say things like “If you can wait until 1pm I’ll give you a special toy, craft, snack, etc.”
  • SPECIAL CRAFT BOXES: I have listed a couple of these below. I do not purchase these until we are doing a 2 day- 18+ hour trip.  These are saved for REALLY special occasions and I only bring these out the 2nd day when its getting hard on them.  
  • DRIVE AT NIGHT: This is something we have done for years.  Our routine is that we leave after work around 5 or 6pm and drive until 12 or 1am.  This way the kids fall asleep around 8pm and that gives us 5 hours of free time they don’t even know about.  I realize this isn’t for everyone, but this has helped us travel far easier.
    • This is only for the USA.  We do not drive at night in any other country for safety reasons.

OUR FAVORITE ITEMS FOR LONG CAR RIDS:

Actually, the number 1 item is the iPad. If you don’t like screen time, then I would be a little leignet on car travel days. Once you get to your destination then put them away until you leave, but this is a great time to loose the screen time for a few days while traveling. However, before we had ipads we still traveled 18+ hours with crafts and entertaining them, so these crafts below are what got us through those times.

  • FUN SNACK IDEAS:
    • SNACK FISHING GAME: Get a stick or top of a fishing pole and tie a piece of yarn to the end with a clip at the end. Have the kids toss it to the front seat and see what they catch. 1 piece at a time! This makes snack time fun and last long!
    • Candy Trail Mix Necklace: When you’re planning your snacks for the adventure, plan items that have holes (pretzels, gummy rings, froot loops, cheerios, dried apples, fruits, etc.) Give them some twine or plastic lace and they can start stringing whatever they love. This is great for when you’re going somewhere with a hike!

Entertaining kids on long car rides can get hard at times. Sometimes there is nothing you can do except pull over and let them run. Let them run at a park, let them run down a dirt road off an exit, just let them run. If none of these ideas work then take 15 – 30 minutes out of the car and it will make everyones day so much better.

UTAH

UTAH

MORE GUIDES THAT ARE CURRENTLY BEING CREATED:

We’re gathering our thoughts, notes, and videos so we can create a guide that gives you information on all the information we wished we had when planning.

Feel free to click through the picture galleries below and see what else Utah has to offer.

THE GUIDES WILL INCLUDE:

  • ADVENTURES
    • HIKES
    • EXCURSIONS
    • SCENIC DRIVES
    • VIEWPOINTS
    • NATURE WALKS
    • ETC.
  • CAMPING
    • CAMPGROUNDS
    • WILD (Free BLM Land)
  • WEATHER
  • GEAR WE USED/ NEEDED
  • ANIMAL AND PLANT LIFE
  • AND MORE

However, no matter how much we wish we could do everything, it’s just not possible. Amazing places always leave you with wanting more. We will provide you with links to the destination’s main site. There you can add your own interest into your itinerary as well.

NEED HELP NOW:

If you can’t find what you are looking for or if you are planning your adventure and need help NOW. Reach out to us. We would love to seed you some quick information off the top of our head to get you started.

Ways to reach out:

You can also check out our resource pages on planning an adventure. Especially How to Find Campgrounds Around your Destination.

ADDITIONAL INFORMATION:

In the meanwhile,  you can view any of our recent posts. Check out our pages designed to help you learn about building a van, entertaining kids, getting gear…cheaply, as well as a free printable packing list and meal plan guides.

Maybe you need guidance on what gear to use backpacking, car camping or or even just get to know us.

Thanks for being patient as we continue to build these guides of where we have been over the past 15 years and where we are now.

WHERE WE ARE NOW:

RECENT POSTS

CATHEDRAL VALLEY

CATHEDRAL VALLEY

A 57 mile dirt road at the northern end of the park where enormous monoliths soar hundreds of feet high. It’s a vast adventure with a remote one of a kind beauty.

You could do this full drive in a day for sure, however that puts you seeing Temple of the Sun and Moon right in the middle of the day. The sun is bright and it gives the Monoliths a cool, but dull overall color. If you choose to wild camp… you get to view them in all their glory. They glow at sunset and and they are on fire at sunrise. If you’re not a wild camper, make an exception just this one time. Get a little uncomfortable for a night. This is a time that it will be all worth it.

They are cool to see in the middle day sun, but when they’re glowing and on fire, they’re unforgettable.

MIDDAY – SUNSET – SUNRISE

It was amazing to witness. I’ve never seen a rock formation be able to take on so many different colors in light. Even watching the sun set and rise you could constantly see the colors changing every minute. Take a look at our gallery below to view all the colors it turned. We edited with keeping its true tones. It was so beautiful.

SCENIC STOPS:

The Entrance: This might be little but this was big to us. There aren’t a lot of National Park Entrances that are a dirt road. We appreciated this and loved every minute of it.

THE OVERLOOK: Take in the vastness of what Capitol Reef really is about. This is just ONE section of Capitol Reef. There is so much more to explore. Take it in, and make plans to come back.

TEMPLE OF THE STARS: Shortly after the Campground you will descend down the steep portion of the overlook and down into some beautiful monoliths! At first we thought these were temple of the sun and moon, but turns out we were wrong. However, still beautiful to behold.

WALLS OF FINS: Take in the beauty of this beautiful drive, with its thin fluted walls.

GYPSUM SINKHOLE: This 200′ deep and almost 50′ wide sinkhole is worth a visit but hard to photograph.  I tried my best.

LOWER CATHEDRAL VALLEY: A MUST DO. Why go here without seeing the best part? Again, please stay until sunset or wake up at sunrise. Worth every minute. What you’ll find there:

  • TEMPLE OF THE SUN

  • TEMPLE OF THE MOON

  • GLASS MOUNTAIN: Glass mountain was the coolest of the 3 even though its only about 12ft high. Not really a mountain but we did climb to the top and act like it was! It was beautiful and so unique. Remember, resist the urge to take anything. You’re in a national park. Along the Road to Temple of the Sun and Moon follow the sign to the right that directions you to glass mountain. They’re all very close together.

HIKING ROUTES: There are also hikes you can do, unfortunately we didn’t do any on our visit. Take look here and it will give you more details: HIKING ROUTES

CAMPGROUNDS:

  • The Cathedral Valley Campground is a primitive campground with 6 sites. We heard it is hardly ever full, so there is a good chance you can get a spot. The best part is that this campground is fee to those who are up for the adventure.

  • There are around 10 pull offs along the way that you can stay at along the road if you wanted to wild camp.

  • WILD CAMPGROUNDS: There are also 2 larger group wild camping stops closer to The Temple of the Sun and Moon. The closest one that we stayed at is located at 38.458, -111.180 You can see the very tip of the Temple of the Sun. We also had the place to ourselves. At sunset and sunrise. We couldn’t believe it!

LENGTH:

  • 57.6 MILES OR WHENEVER YOU WANT TO TURN AROUND.
  • ALLOT AROUND 6-8 HOURS

Distances from Highway 24 starting on the Hartnet Road (traveling clockwise)

  • Hwy 24 junction to Lower South Desert Overlook – 15.2 miles
  • Hwy 24 junction to Upper South Desert Overlook- 27.2 miles
  • Hwy 24 junction to Cathedral Road Junction- 27.8 miles
  • Hwy 24 junction to Cathedral Valley Campground- 28.1 miles
  • Hwy 24 junction back to Hwy 24 via Cathedral Rd 57.6 miles

TRAVEL DETAILS:

This driving loop takes about 6-8 hours to complete. Most visitors to Cathedral Valley drive the 57.6 mile (92.7 km) loop clockwise, beginning on the Hartnet Road located 11.7 miles (18.8 km) east of the visitor center on Highway 24 and continuing on that for 27.8 miles (44.7 km) to Hartnet Junction. Turn right (north) onto Cathedral Road and driving 29.9 miles (48.0 km) back to Highway 24 will complete the loop. 

We want to first say that you do need a high clearance vehicle if you are going when the Harnett Road River Fjord is high and you have to cross. However, you don’t have to go that way if you don’t have a high clearance vehicle. You can start on the Cathedral Road crossing near Caineville, drive to the Sun and Moon, and then just turn around the way you came. That would be totally worth it and not too long of a drive either. However, if you can, continue on there is so much more to see.

We started at Harnet Road Crossing. It was pretty simple to just follow the road signs that take you all they way down. We did use our Garmin Overlander that has GPS so that helped. I have listed the coordinates below for you.

and then just drive the same way out instead of doing the loop. We went in May and the river bed was dried up. We never got to adventure crossing it you could try that as well. You can read more tips planning and safety here.

GPS COORDINATES

  • Cathedral Valley Entrance Sign: 38.469, – 111.381
  • Temple of the Stars: 38.489, -111.353
  • Gypsum Sink Hole: 38.499, -111.319
  • Temple of the Sun, Moon, and Glass Mountain: 38.499, -111.319

You can always put GPS Coordinates into your map apps and as long as you have it loaded up before you loose service it will work!

GEAR CLOTHING WE NEEDED

With climbing up and down on sandstone it’s best to have good grip hiking shoes or sandals. Here are our favorites.

During those warm summer months just make sure to bring sun screen, a hat, and always extra water. We always like our Days packs with our hydration bladder. Here are a few of our favorites.

CATHEDRAL VALLEY GALLERY

BACK TO:

Click here to return to our Complete Guide to Capitol Reef National Park

RECENT POSTS: